
Have you ever wondered how automatic lights know when you’re approaching? Or how security systems detect when someone enters a room? The magic happens thanks to a clever little device called a PIR sensor! Today, we’ll explore one of the most popular and beginner-friendly motion sensors: the HC-SR501 PIR Infrared Motion Sensor.
What is a PIR Sensor?
PIR stands for Passive Infrared. Think of it as an electronic “eye” that can “see” heat instead of light. Everything around us that’s warmer than absolute zero (including you!) gives off invisible heat energy called infrared radiation. The warmer something is, the more infrared radiation it emits.
The HC-SR501 is called “passive” because it doesn’t send out any signals—it just sits there quietly “listening” for changes in the heat patterns around it. When something warm (like a person or pet) moves within its detection area, it notices the change and triggers an output signal.
How Does the HC-SR501 Work?
The Science Made Simple: Inside the HC-SR501 is a special component called a pyroelectric sensor with two sensing windows. When everything in the room is still, both windows detect the same amount of background heat. But when you walk by, your body heat affects one window more than the other, creating a difference that the sensor interprets as motion.
The White Dome: That distinctive white plastic dome on top isn’t just for protection—it’s actually a special lens called a Fresnel lens. This lens acts like multiple magnifying glasses working together to expand the sensor’s field of view and focus infrared radiation from different areas onto the tiny sensor inside.
Key Specifications
Here are the important numbers you need to know:
- Detection Range: 3 to 7 meters (10 to 23 feet) – adjustable
- Detection Angle: About 110-120 degrees
- Operating Voltage: 4.5V to 20V DC (5V recommended for Arduino)
- Output Signal: 3.3V when motion detected, 0V when idle
- Current Consumption: Less than 50 microamps (very power efficient!)
- Warm-up Time: 30-60 seconds when first powered on
Understanding the HC-SR501 Layout
Three Main Pins:
- VCC: Power input (connect to 5V)
- GND: Ground connection
- OUT: Signal output (connects to your microcontroller)
Two Adjustment Potentiometers (the orange knobs):
- Sensitivity Adjustment (Sx):
- Controls how far the sensor can detect motion
- Turn clockwise: Increases range (up to 7 meters)
- Turn counterclockwise: Decreases range (down to 3 meters)
- Time Delay Adjustment (Tx):
- Sets how long the output stays HIGH after detecting motion
- Turn clockwise: Longer delay (up to 5 minutes)
- Turn counterclockwise: Shorter delay (as low as 5 seconds)
Trigger Mode Jumper:
- H Position (Repeating Trigger): Sensor continues to detect motion while you’re in range
- L Position (Single Trigger): Sensor triggers once, then waits for the delay period to finish
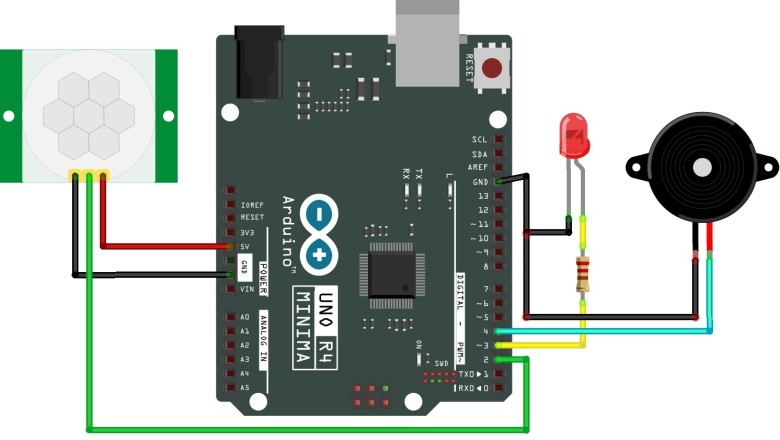
Getting Started: Your First Test
What You’ll Need:
- HC-SR501 sensor
- Arduino Uno (or any 5V microcontroller)
- LED and 220-ohm resistor
- Breadboard and jumper wires
Simple Wiring:
- Connect VCC to Arduino 5V
- Connect GND to Arduino GND
- Connect OUT to Arduino digital pin 2
- Connect LED through resistor to pin 13
Basic Code:
int pirPin = 2;    // PIR sensor connected to pin 2

int ledPin = 13;   // LED connected to pin 13

void setup() {

  pinMode(pirPin, INPUT);

  pinMode(ledPin, OUTPUT);

  Serial.begin(9600);

  // Wait for sensor to warm up

  Serial.println("Warming up sensor...");

  delay(60000);  // Wait 60 seconds

  Serial.println("Sensor ready!");

}

void loop() {

  if (digitalRead(pirPin) == HIGH) {

    digitalWrite(ledPin, HIGH);

    Serial.println("Motion detected!");

  } else {

    digitalWrite(ledPin, LOW);

  }

  delay(100);

}
Important Timing Considerations
Warm-up Period: When you first power on the HC-SR501, it needs 30-60 seconds to adjust to the room’s baseline infrared levels. During this time, it might give false readings, so always include this delay in your code.
Blocking Time: After the sensor output goes from HIGH to LOW, there’s a built-in 2.5-second “blocking period” where the sensor won’t detect any motion. This is normal behavior and prevents false triggering.
Practical Applications
Home Automation:
- Automatic hallway lights
- Smart bathroom fans
- Energy-saving room lighting
Security Projects:
- Simple alarm systems
- Visitor detection for doorbells
- Wildlife monitoring cameras
Fun Projects:
- Halloween decorations that activate when someone approaches
- Pet monitoring systems
- Interactive art installations
Tips for Success
Placement Matters:
- Mount the sensor horizontally for best human detection
- Avoid pointing it directly at heat sources (radiators, sunlight)
- Keep it away from moving objects like curtains or plants
Fine-Tuning:
- Start with sensitivity in the middle position
- Set time delay to at least 3 seconds for Arduino projects
- Use “H” (repeating trigger) mode for most applications
Troubleshooting:
- If it’s too sensitive, turn the sensitivity knob counterclockwise
- If it’s not detecting motion, check your wiring and increase sensitivity
- Remember the warm-up period—be patient!
Advanced Features (Optional)
The HC-SR501 has solder pads for two optional components:
- RL Pad: Add a light-dependent resistor (LDR) to make the sensor only work in darkness
- RT Pad: Add a thermistor for temperature compensation
These are advanced modifications that most beginners won’t need.
Ready to Build Something Amazing?
The HC-SR501 PIR sensor is an excellent starting point for motion detection projects. It’s reliable, affordable, and works right out of the box with minimal setup. Whether you’re building a simple automatic light or a complex home automation system, this sensor provides the motion detection foundation you need.
Next Steps:
- Try the basic test circuit above
- Experiment with the sensitivity and timing adjustments
- Combine it with other sensors and outputs for more complex projects
- Check out online communities for project inspiration
The world of motion sensing awaits—now get out there and start building!